How to Create Labels in Gmail. Creating labels on Gmail allows one to organize their work. It is an easy way of managing emails efficiently by acting as customisable tags assigned to emails. It allows you to prioritize your messages and can also organize the work in topics pr by project. Follow the steps below to organize your Gmail into labels.
How to Create Labels in Gmail
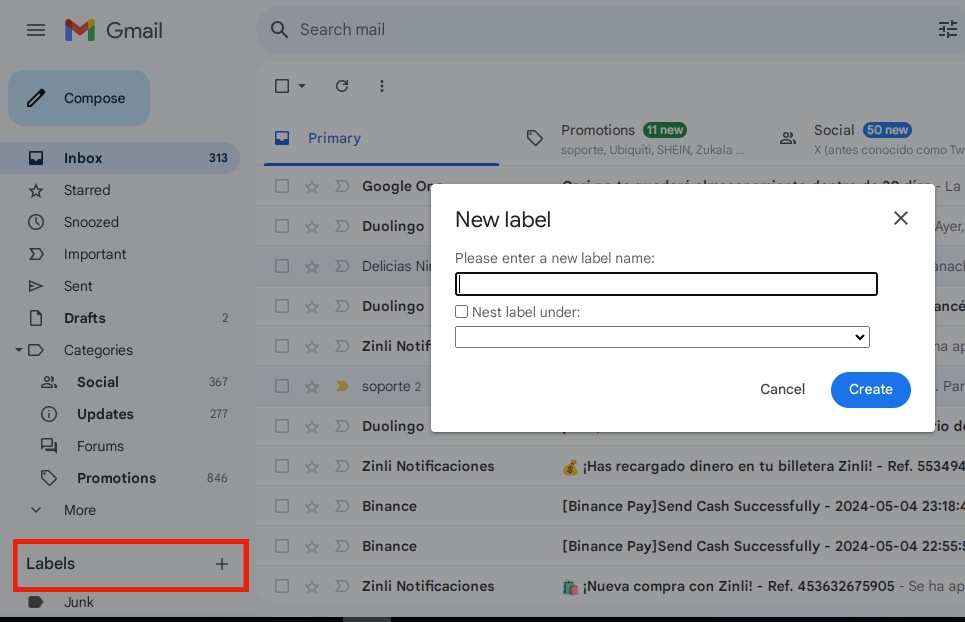
Follow the steps below to Create a Label
- Go to your Gmail from computer.
- From the left side, scroll down and click More.
- Click on Create New label.
- Give your Label a name.
- Click on Create.
Manage Labels
You can edit or delete labels in your Gmail. Follow the steps below to do so.
- Go to your Gmail account.
- Click on the left side of the page and select the labes name.
- Click on the three vertical dots that appear to access a menu.
- Edit the label.

Delete a Label
- Follow the steps below to delete a label.
- Go to your Gmail on your computer.
- Hover on the label’s name that you wish to delete.
- Click on the three vertical dots that appear.
- Choose Remove Label.
Add Label to Messages Inbox
- Go to your Gmail account.
- Select the messages you wish to label.
- Click on Labels at the top.
- Choose the label you wish to add them to or create a New label.
Label a Message as you Compose
You can label a message as you compose it using the following steps.
- Go to your Gmail,
- Click on Compose.
- At the bottom right, click on the three dots for a menu to appear.
- Click on Label.
- Select the Label you wish to add and click Apply.
Move a Message to Another Label
If you make a mistake and want to move a message to a different label, you can follow the steps below.
- Go to your Gmail Account.
- Choose the message whose label you want to change.
- Click on Labels at the Top.
- Uncheck the existing label and choose a new one.
- Click Apply.
Hi! Kim here!
ABOUT ME
Creative and versatile writer with over 10 years of experience in content creation, copywriting, and editorial roles. Adept at crafting compelling narratives, engaging audiences, and meeting tight deadlines. Proficient in SEO practices, social media strategy, and content management systems.
Senior Content Writer
The Login. & co, New York, NY
June 2018 – Present
Lead a team of writers to produce high-quality content for various clients, including blogs, articles, and social media posts.
Developed content strategies that increased website traffic by 40% over a year.
Collaborated with marketing teams to create engaging campaigns and promotional materials.
Wrote copy for advertising campaigns, product descriptions, and email newsletters.
Conducted market research to tailor content to target audiences.
Improved client engagement rates by 30% through effective copywriting techniques.
Skills
Writing & Editing: Creative writing, copywriting, content creation, proofreading, editorial processes.
Technical: SEO practices, content management systems (WordPress, Drupal), Microsoft Office Suite, Google Workspace.
Marketing: Social media strategy, digital marketing, email marketing.
Research: Market research, data analysis, trend identification.
Contact me:

